How to: Catherdral Window

This is a beautiful technique which simulates the look of quilting and patchwork but the great advantage to it is that once each piece is completed, it will already have a tidy, finished backing which means there is no extra work to be done.

I hope you find these instructions, accompanied by photos simple and straightforward. As with many techniques, working through the process a number of times, is the best way to ‘get it’.

Materials needed:
4 x 25cm squares of cotton fabric
4 x 9cm squares of contrasting fabric
Iron
Needle and matching thread
Scissors

Step 1:
Stage 1 CW
To make it easier to fold your fabric over the next few stages, iron diagonals to create a cross crease and a centre point from corner to corner. Then iron a 1/2cm border all the way around the square.

Step 2:
Stage 2 CW
Fold corner points of square into the centre and iron flat.

Step 3:
Stage 3 CW
Again, fold new corner points into the centre of square and iron flat. Then, stitch the centre point flaps, where they meet in the middle, to opposing flap but not under-layers of square.

Step 4:
Stage 4 CW
Make another folded square, following the instructions above and then whip stitch the two outside edges of the squares together (this will be covered by a cotton square, so don’t worry about neatness on this ‘right’ side so much).

Step 5:
Stage 5 CW
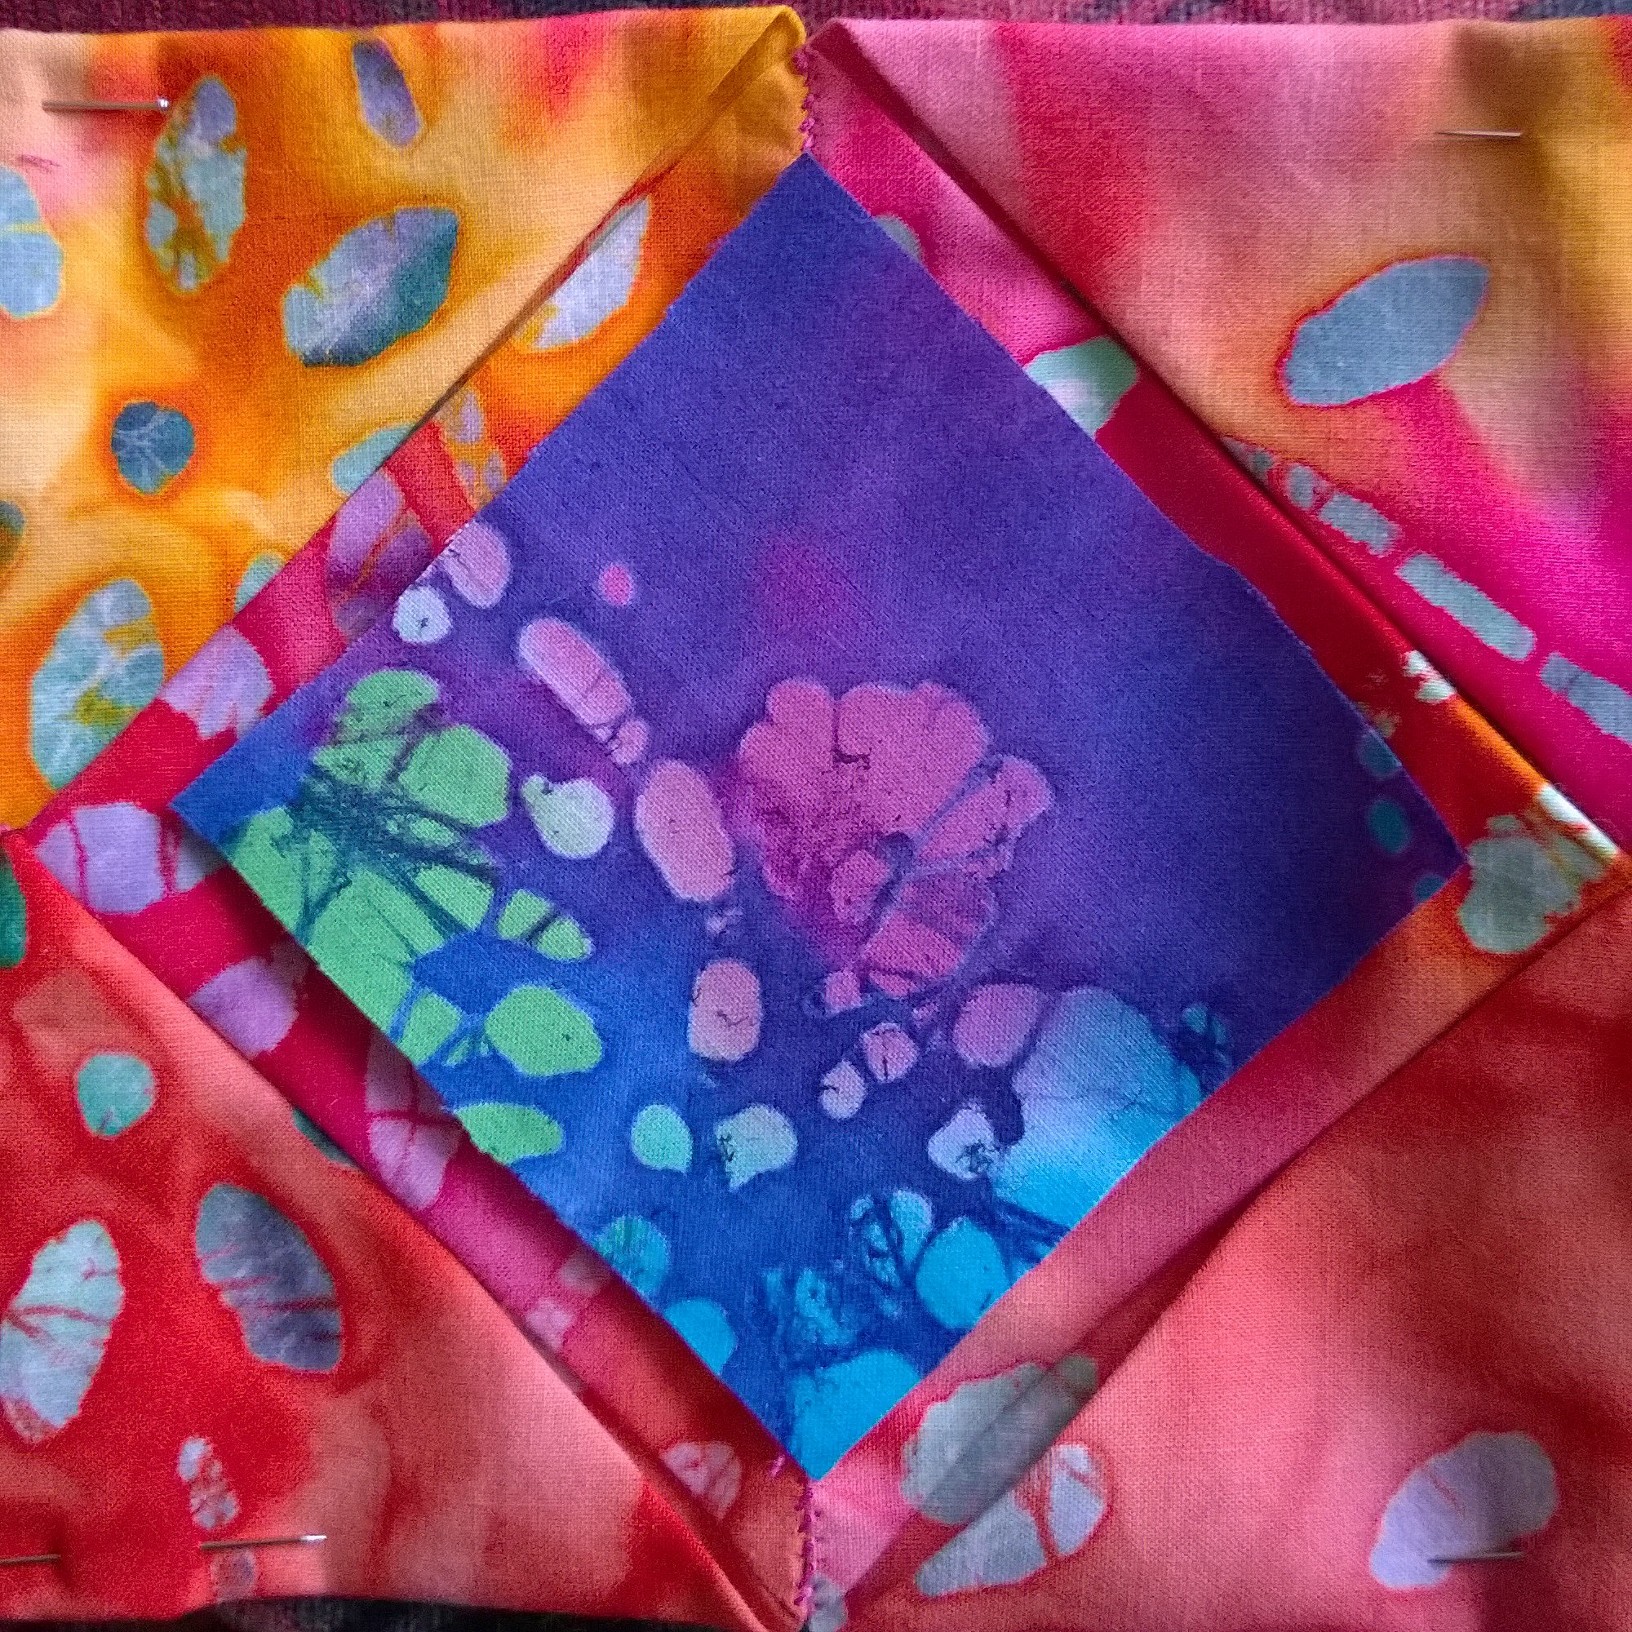
Place 9cm square over the stitched line and pin squarely.

Step 6:
Stage 6 CW
Fold the fabric from the under squares to form a frame around the 9cm square. Create a curve on each edge, so that it is wider in the middle and narrower at the edge, ensuring to neatly cover the under stitching.

Step 7:
Stage 7 CW
Slip stitch the border frame around the 9cm cotton insert ‘window’.

Step 8:
Stage 8 CW
Repeat stages 1-7 to create another pairs of squares with one ‘window’ insert. Stitch them together like Stage 4 and then place two more ‘Cathedral Windows’ following stages 5-7.

You can now continue, following these instructions, to make beautiful Cathedral Window pieces.

If you make two squares and one window, why not turn it into a needle case. Four squares and four windows could be a cushion or a table protector. Join squares to create a rectangle for a table runner or just go mad and make a quilt!

Traditionally, Cathedral Windows would have been made with white fabric (I find cheap curtain lining works well – recycle from your old, washed curtains) and small, square scraps.

Have fun, variegate your fabrics, use up leftovers!

How to: Crochet a beret

Beret Tweed wool Mull

Beret made using beautiful Ardalanish ‘Manx’ wool spun in Mull and Manos Silk Blend Fino

This quick and easy beret, which can be crocheted in one evening and a great way to use up similar weight wools. Depending on the colours and weights of wool/cotton you choose, it could be worn all year round!

These instructions are free for anyone to use for their own person fun, but cannot be reproduced in any other format without Louise Underwood’s permission.

Instructions:

You will need:

* Approximately 400m of chosen double knit or fine and aran weight mixed(200 of each wool or the equivalent in ‘odds and ends’) 

* 4.5mm crochet hook

* Tapestry/wool needle

Using two contrasting/complementary wools/cottons/silks together at a time to create a ‘tweed’ look, make 4 chains.

Row 1:

Treble crochet into first chain stitch 9 times, then slip stitch to join circle (10 stitches)

Row 2:

Chain 3 stitches, crochet 2 trebles into each stich to end (20 stitches)

Row 3:

Chain 3, *2 treble crochets into next stitch, then 1 into next* – repeat from * to end, slip stitch to join circle. (30 stitches)

Row 4:

Repeat row 3. (44 stitches)

Row 5:

Repeat row 3 (65 stitches)

Row 6:

Chain 3, then crochet one treble into each stitch, join circle with slip stitch.

Row 7:

Repeat row 3 (98 stitches)

Row 8 -11:

Repeat row 6

Row 12:

Chain 2, *double crochet into next stitch, then decrease 1 stitch by double crocheting into the next two stitches at once*, repeat from * to end, then slip stich to join circle. (70 stitches)

Row 13:

Chain 2, then double crochet into every stitch, slip stitch to finish.

Row 14:

Chain 2, *double crochet into next 2 stitches, then decrease 1 stitch by double crocheting into next 2 stitches at once*,

repeat from * to end, then slip stitch to join circle. (53 stitches)

Row 15- 17:

Repeat row 13, then cast off.

Beret Tweed 3

When crocheted, you can see above how the Ardalanish wool and Manos silk, blend into beautiful tones.

Beret Tweed 1

This photo shows how mixing Debbie Bliss cotton denim aran and Rowan handknit cotton together create a great ‘tweed’ look to your crochet.

Beret Flower 1

Above, you can see how using up you wool ‘left-overs’ is a great way to create a very colourful and fun look.

When making your beret, there may be times when you have a few more or a few less stitches, but don’t worry, these can always be added in/taken out on the next row. Also, by slightly increasing or decreasing the number of stitches you have will change the size to fit your head. Another thing to consider is, if you wish to go for a more flamboyant look, complete a couple more rounds of crochet at the row 11 point and add some decoration!

Large beret

Have Fun!

Sampler Patchwork Quilt

Since Christmas I have slowly been working on a hand stitched, English paper pieced patchwork quilt. I have recently finished these three sections – I am hoping to make 16 in total, 55 cm square.

Flying Geese
This piece is ‘Flying Geese’ or maybe even a squadron of geese!

Dresden Plates
Dresden Plates, designed by my six year old daughter.

When finished, the quilt should definitely fit a double if not a king size bed.

Lone Star 2
Lone Star, or not so, to be placed in one of the corners of the quilt along with a panel previously Blogged.

Hooky mat ‘Matriarchal Trefoil’

Using the traditional ‘hooky’ technique used for making rugs, I have recently finished this portrait of the three strong matriarchs in my family: my Mum, my Nan and my Great Aunty Wilma. I decided to use the trefoil design as I am very much inspired by the colours and designs used in stain glass window design and felt the traditional look of the ‘stone’ trefoil would frame the portraits nicely.

The hessian still stretched on a wooden mat frame still holds the piece in place whilst I find the right piece of wood to back the trefoil for hanging. I have worked using strips of old clothes and blankets, mainly wool but sometimes using old t-shirts and fleeces. Particularly when creating portraits I like to use fabric that belonged to that person and/or their family.

WP_20140622_01820140622223128